Showing posts with label challenge. Show all posts

Sunday, January 31, 2016

CASology week 182: adore


This week's challenge over on the CASology blog is all about the word ADORE.  I decided to use this as my reminder to get some Valentine's cards made.

I grabbed some anaglypta wallpaper samples and used my PTI hearts coverplate.  I also cut out some red shimmer card stock and scrap black hearts as well.  (The black is actually packaging from some perfume - it had a nice texture and heft to it!) 
I added the hearts and stamped the sentiment multiple times with my trusty MISTI which worked perfectly with the ever popular Versafine Onyx Black.  If I had done this on my own, it would've never worked, especially stamping on textured wallpaper!!
 I made a few more Valentine cards - this one using the Gold Luxe pack from PTI.
The 'U' is stamped with Fresh Ink fuschia and some Versafine Onyx Black.  Lots of double and triple stamping with the MISTI, again!
And my last one was with some Avery Elle orchid ink and Bloomer bursts from PTI with the sentiment from the same company.  The sentiment is stamped in Fresh Ink fuschia and Versafine.
I raised this panel up with some foam tape to add a little texture to an otherwise incredibly simple card! :)
Thank you to CASology for getting me to get these Valentines done!! :)

Sunday, June 29, 2014

AEI♥U Challenge #10–Gold! #2

I just love this AEIU challenge which is all about gold ... yum!  I recently got this gorgeous sentiment set from Avery Elle called Oh Happy Day.  I just love the font used.  I stamped it in VersaMark over top of a Fresh Ink Provincial Gray woodgrain stamped background from Heidi Swapp.
I added some Zing Gold Glitter embossing powder and added the flower and leaves from the same sentiment set.  Hard to capture the gold embossing but here's a closeup nonetheless:

Monday, February 10, 2014

Papertrey Ink Anniversary Challenge - word focus + Cure for the Monday Blues

Today's challenge over at Papertrey is to create a project with the word as the focus.  I played around with watercolour stamping, stamping with mists and good old fashioned stamping with ink pads.  This does not lead to a perfect stamped impression but more of an artsy look ...
I used Distress Markers and water, Mistery Huey's gold mist and even my Brilliance Galaxy Gold ink pad and Soft Stone Hero Arts Shadow Ink.  All in all, there are probably about 6 different shades  (edited to add - just counted after creating my supply list - 8 colours altogether!!) ...
I added the Happy die cut as my central word focus (as per the PTI challenge) and used some gold glitter paper.
I tried to get some shots to show the sparkle of the stamping but not sure if you can even see it ... maybe a little?
I also used the Cure for the Monday Blues image as inspiration - the candy reminded me of these circles from the Sketched Shapes by the uber talented Maile Belles.  Taheerah found a great image to brighten our week:
I took the pinks and reds from the pic and added some golds to the mix for my creation.   Love those sprinkles in the shot! :)

Not sure if I am loving my final creation but I am posting it anyhow ... :)

----
If you are in need of some crafty supplies, check out my sale page here.

Supplies:
Paper: PTI Rustic White, black glitter (DCWV)
Stamps: PTI Sketched Shapes
Inks: Mister Huey's gold, Brilliance Gold Galaxy, Hero Arts Soft Stone, Distress Markers (Antique Linen, Spun Sugar, Aged Mahogany, Picked Raspberry, Barn Door)
Misc: PTI Happy one liner die

Saturday, July 27, 2013

Runway Inspired RIC#40: Stella McCartney

This colour combo is so not my usual so I thought it was perfect to challenge myself. 

I pressed some Studio Calico Hearts and Arrows wood veneers into ink - Fresh red currant and mango and since I didn't have a bright enough yellow, used some dollar store pearlescent paint.  I added some Rock Candy Stickles for a little shine.
I made a little mistake on the sentiment - I meant to stamp the U in Hero Arts mid tone wet cement and then layer the rest in Versafine Black Onyx over top but stamped the U in black first so reworked the whole thing a bit.  Oops!  To get the gray part all in one line, I covered some of the words with washi tape before stamping into the ink pad and then removing it to stamp on the card.  This is another way of masking sentiments.  (The sentiment is configured in a stacked row so I had to get creative unless I wanted to cut it apart ...)

Supplies:
Paper: Staples 110lb white
Stamps: PTI Live Love Life
Supplies: Versafine Black Onyx; Fresh red currant, mango; Hero Arts mid tone wet cement
Misc: Studio Calico Hearts and Arrows wood veneers, dollar store yellow paint, Glossy Accents

------

My next card also features Live Love Life from PTI's uber talented Maile Belles:
I stamped the sentiment repeatedly using Hero Arts mid tone wet cement and Versafine Black Onyx before adding the hearts in red currant, mango and harvest Fresh inks.
Supplies:
Paper: Staples 110lb white
Stamps: PTI Live Love Life
Ink: Hero Arts mid tone wet cement, Versafine Black Onyx, Fresh red currant, mango and harvest 

Thanks to RIC for the colour challenge!  Happy hopping to you all!  Oh, and if you are looking for some crafty supplies, check out my sale page here to see if anything catches your eye.  I've got grid journalling cards, an impression plate and some stamps!

CASology cue week 54 - gold

I stumbled upon Week 54 of CASology's challenge - gold.  I have gold mist, gold ink and even gold paint and sequins!  I used a few of these supplies to create some cards using this as my jumping off point.

For my first card, I used some LCI woodgrain cardstock that I misted with Mister Huey's gold mist.  I also added a Heidi Swapp resist chipboard heart that I pressed into my Brilliance Galaxy Gold for some more gold shimmer.
 Here's a closeup of some of the shine - hopefully it comes through in the picture:
Almost one layer, right?!  And no stamps - can you believe it?!!! :-0

Supplies:
Paper: SU Basic Gray, LCI woodgrain
Misc: PTI Wonderful Words hello die, Heidi Swapp mistable heart, Mister Huey's gold mist

-------

For my next card, I grabbed my pack of Studio Calico Speech Bubbles wood veneers (from the Snippets collection) and pressed one of them into my beloved Brilliance Galaxy Gold ink pad.  Love this ink!!


I stamped my nephew's name using Versafine Black Onyx using Lawn Fawn stamps - alpha stamps are great for personalizing cards!

I added some gold heat embossing with Zing powder combined with Versamark and PTI's Irresistible Ikat set.  Very simple but striking patterns in this set.
Since I had the alphabet stamps out and his name all lined up, I changed the first letter to a capital (it wouldn't fit on the speech bubble!) and stamped a wooden tag.  I used a bicycle stamp (Hero Arts Joy Ride) underneath it since he loves scooting so much!  I know he will appreciate it and my sister can use it for her scrapbook.  I'll add some baker's twine to it and a glue dot or three on the back so it's all ready for her.

Tip for stamping on wood - use pigment inks NOT dye inks unless you want the ink to bleed .... ask me how I know!?

Supplies:
Card
Paper: Staples 110lb white
Stamps: Lawn Fawn Claire's ABCs
Ink: Versamark, Versafine Black OnyxBrilliance Galaxy Gold
Misc: Zing embossing powder (gold),  Studio Calico Speech Bubbles wood veneers

Tag - wooden tag (Impress rubber stamps), Lawn Fawn Claire's ABCs, Versafine Black Onyx, Fresh steel blue ink, Hero Arts Joy Ride

----

One more card to go - when I make cards for a challenge or hop, I like to pull a bunch of supplies that might work and then just build up my stash.  Why not, right?

I have seen this technique before with the full alphabet die cut out and then just a few letters highlighted in some way.  Thought I would give it a go with 'hi' and had a piece of gold shimmer card stock already cut out to use the alpha die cuts.
I glued a piece of patterned card stock behind the 'h' and 'i' and then added some Glossy Accents for shine.
I added a ton of  foam dots behind and popped the panel up onto a piece of white card stock which served as my base.  I made the gold card stock basically reach down top and bottom and only had it matted with white on the sides for a bit of a different effect.

Here you can see the shine from the shimmery paper and the Glossy Accents a bit better:
Oh, and I think I have found the trick to Glossy Accents - I used to keep it nozzle down with my bone folder, pens and X-acto knives but now am storing it on its side and it hasn't clogged and the glue is always ready to go.  Tombo Mono Multi I store nozzle down but Glossy Accents seems to prefer lying on its side ... whatever works, right? :-)

Supplies:
Paper: Recollections gold shimmer, Staples 110lb white, scrap red patterned paper
Misc: PTI Outline Alphabet die set, Glossy Accents, foam dots
-------
If you are looking for some crafty supplies, check out my sale page here to see if anything catches your eye.  I've got grid journalling cards, an impression plate and some stamps!


Wednesday, July 3, 2013

Festive Friday Element Challenge #11

So I decided to take part in the element challenge over at Festive Friday ... but I just realized that one of my cards is not really using a tree element ... well, maybe it is - do branches or wreaths count? :-0  Uh oh ....
For my first card, I used an intricate Memory Box die to cut out the wreath using some Basic Grey Wonderland paper.  I layered it on another piece of patterned paper from the same pad and then added some bling ...
 Who doesn't love a sprinkling of sequins, right?  So this is big for me - no stamping!  Very very rare!

My other card is the one I made first but I had some .... issues, shall we say, so not my best to say the least.  I stamped the trunk a bit off centre so added shadow stamping plus another colour.  This is also a Memory Box die ... don't look too closely at this one, o
I cut it out of gold shimmery paper but it was not fun to try and get all the bits out!  For adhering to the card, I ended up pouncing lots of Tombo Mono Multi adhesive on the die cut before pressing it on to the card panel.
Thanks, Meredith, for the challenge!  I promise I'll follow the rules more closely next time! :P

Supplies:
Wreath card
Paper: Basic Grey Wonderland 6x6, Staples 110lb white
Misc: Memory Box wreath die, Tombo Mono Multi adhesive, Kelly Purkey flat silver sequins, Etsy red sequins

Winter Wonderland Tree card
Paper: Basic Grey Wonderland 6x6, Staples 110lb white, Recollections gold shimmer
Stamps: PTI Bountiful Banners
Ink: Fresh red currant, chocolate
Misc: foam dots, Memory Box Winter Wonderland die, Tombo Mono Multi adhesive

Sunday, April 7, 2013

Festive Friday - colour challenge: Aqua, Blush and Gold

The fabulous Meredith MacRitchie and her amazing DT over at Festive Friday http://festivefriday.blogspot.ca/ have challenged us to use the above colours for a holiday card.  I have been remiss in posting my creations and made sure to get mine in on time this time.

These are the two I made for the Rustic challenge but didn't get a chance to submit:

I'm not very good at rustic and it's not my usual style so I just threw in some cork and kraft on the first card and rustic cream card stock on a vellum card base on the second.  Kinda sorta not really rustic ... :)  Anyhoo, just wanted Mer to know the thought was there! <3 br="">

So, luckily I did have a chance to create (and photograph! and post!) two cards for this colour challenge:
I used my Avery Elle Ikat set with Fresh sugar ink on Aqua Mist card stock and added the Think Big sentiment in Fuschia and clear embossed it.
Some sparkly ribbon along the side and gold embossed wood veeneer stars and that's it!  (To heat emboss the wood, just pounce them in Versamark and then shake embossing powder over top before heating it up.)

** edited to add - this card was given a shout out on the Festive Friday blog: thanks so much for the sweet words! 

For my next card, I went with a rustic white card base and used the Herringbone background stamp in Brilliance Galaxy Gold ink.  The shine in person is awesome with that ink!  Do you have a favourite gold that you use?  Which one?
I added a layer of Aqua Mist cardstock and stamped the stitches in Versamark repeatedly for some subtle watermarking and stamped the Think Big sentiment with Versamark before using some Zing embossing powder in gold.
I added Fresh sugar stamped chevrons to the poinsettia die cuts and added rock candy glitter to the top layer before topping it with a gold pearl.

Supplies:
Paper: PTI Aqua Mist
Ink: Fresh sugar, fuschia; Versamark
Stamps: Avery Elle Ikat, PTI Think Big
Misc: Studio Calico star wood veneers, Zing embossing powder: gold and clear, sparkly pink ribbon from stash
Paper: PTI Rustic White, Aqua Mist, Staples 110lb white
Ink: Versamark, Fresh sugar, Brilliance Galaxy Gold
Stamps: PTI Think Big, BB: Chevrons, BB: Herringbone, Stitches
Misc: Zing embossing powder: gold, gold pearl


Sunday, January 27, 2013

Passion for Papertrey: Black and white challenge #1

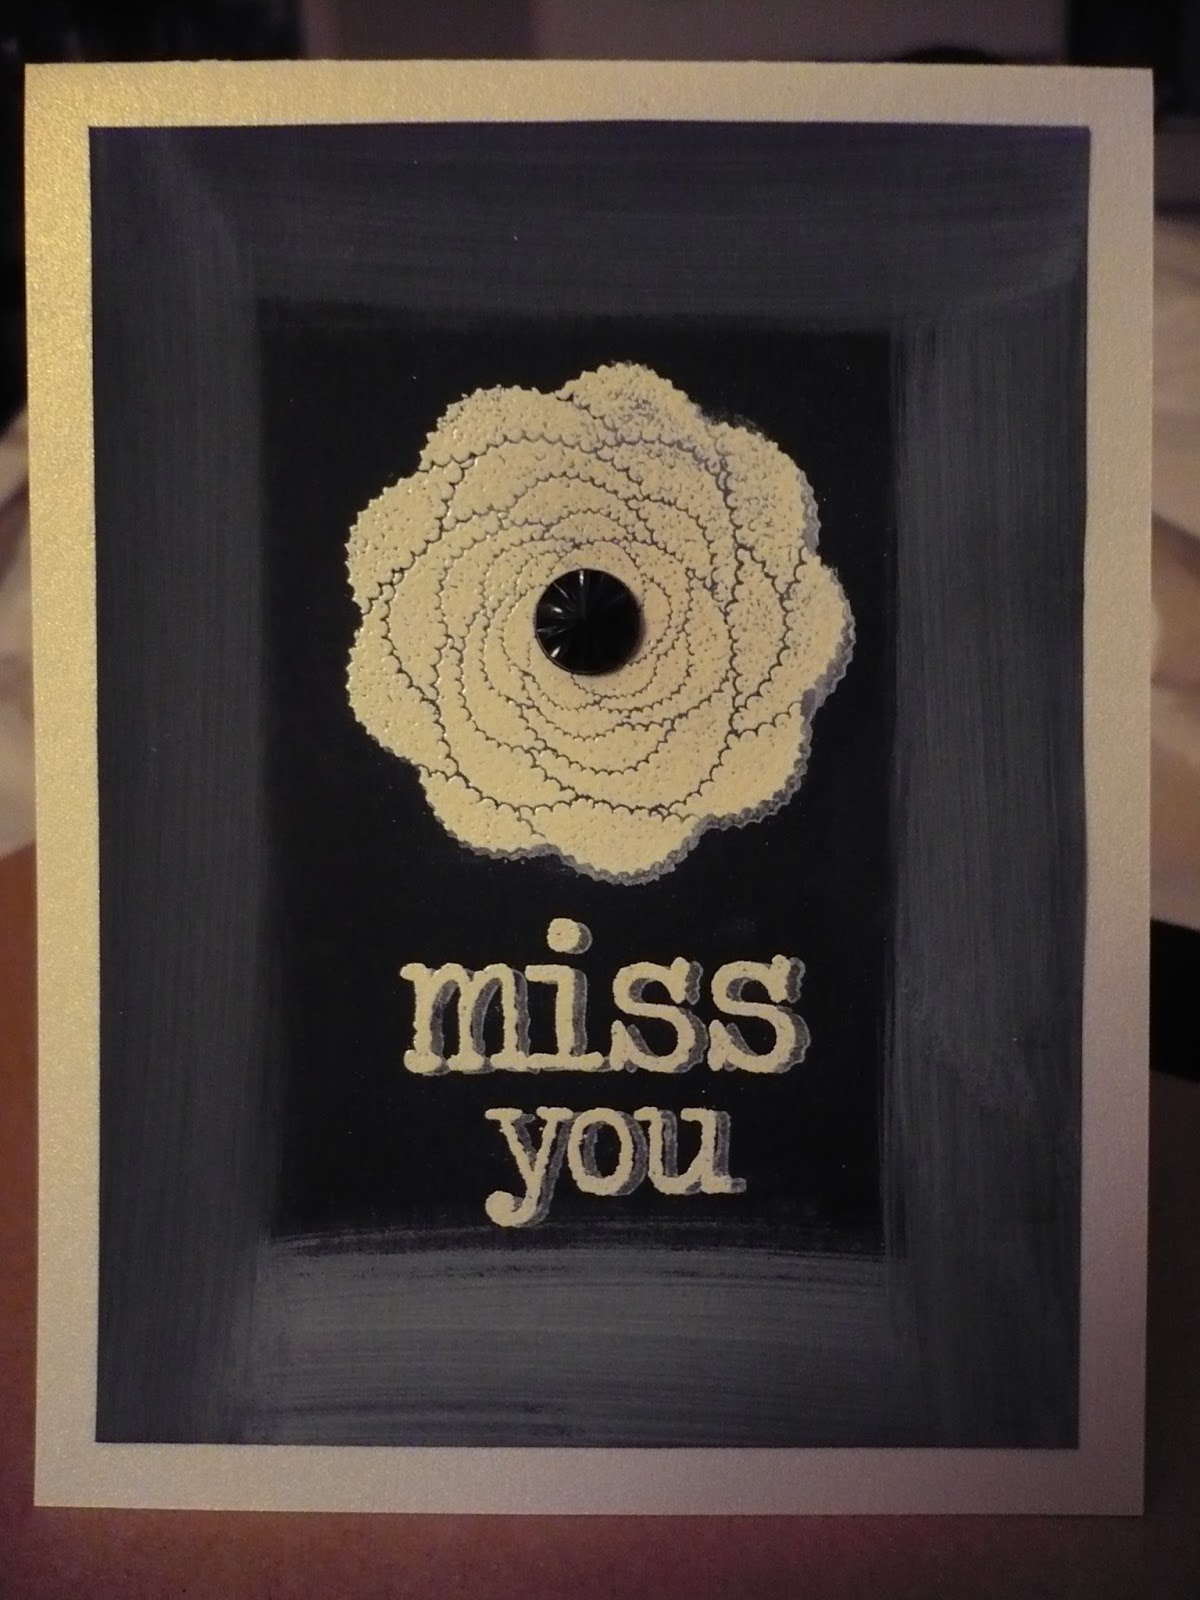
Over at A Passion for Papertrey, the lovely and talented ladies have a new challenge featuring the classic combination of black and white.  I decided to finally try the chalkboard technique and have some fun with it.  I followed Betsy Veldman's tutorial for a Papertrey Make it Monday which was very helpful.  I kept it simpler with less blending for the look I wanted.
 I stamped a Natural Beauties flower and then Wonderful Words' sentiments with Versamark and then embossed with Zing white embossing powder.  Next I stamped the flowers and sentiments over top and slightly off with Colorbox Frost White Ink
I took a wet baby wipe with some Frost White Ink and swiped it around the edges.  I had originally tried blending with my fingers but it looked horrible so went with this instead.
I added a Recollections black sparkly embellishment to add a little bling and mounted the card front to a white shimmer piece of cardstock.

This technique was a lot of fun and I will be trying it again soon!  I made one more card while my supplies were out so make sure to take a look at it too. :)

Have you tried this yet?  Show me what you have created in the comments below or in my other post.  I'd love to see some more examples of this ...

Supplies:
Paper: black cardstock, white shimmer cardstock
Stamps: PTI Natural Beauties, Wonderful Words additions
Ink: Versamark, Colorbox Frost White
Misc: Zing white embossing powder; Recollections embellishment

Thursday, January 24, 2013

Ribbon Girl challenge - pink and ivory/Moxie Fab window card challenge

Over at the Ribbon Girl blog, their challenge is ivory and pink and Moxie Fab has a window card challenge.  I decided to combine the two and make a hot pink card with some ivory and a window to boot!
I took a piece of Cosmo Cricket's DeLovely paper from a 6 x 6 pad I won from the lovely and talented Aga a while back and used that to cover my cream card base front.  I cut out an Angled Labels die window and then made a frame with two of the dies together.
I added some acetate and stamped the sentiment from Studio Calico's Oh Snap stamp set from  in StazOn Jet Black.  This is the best ink to use on acetate because it doesn't smear.  I am a little OCD about my clear stamps so I quickly used some StazOn stamp cleaner so my stamp is clear again ... I like being able to see through my stamps completely! :)

Next, I stamped the Studio Calico grid pattern background stamp underneath on the inner part of the card using Fresh ink in Sugar.  This adds a little extra interest through the window.

Have you made any window cards lately?  Do you like to add acetate or just leave them open?

Supplies:
Paper: Cosmo Cricket DeLovely 6 x 6 pad, Staples 110lb cream
Stamps: Studio Calico grid pattern background stamp, Studio Calico's Oh Snap
Ink: Fresh Sugar,  StazOn Jet Black, PTI Angled Labels dies, acetate