Saturday, August 29, 2015

Stamp-a-Faire - Mixing Colours: For you

For this challenge, Dawn challenged us to mix colours we might not usually mix or use.  I grabbed an old favourite I haven't used for a while, Round Repeats, and chose some colours from the Fresh Ink and Avery Elle pigment shades I have: Mint to Be, Pool, Sugar Plum and Turquoise.
I took a 110lb white Recollections wine bottle tag die cut and started stamping the various colours directly across from each other.
 I love this set because it is so simple but so versatile.  I wanted to make a wine tag for a card set I am gifting to someone.  They are such useful things to include in a set and so simple to make.
I did some selective stamping for the sentiment using the Hooray set - just a simple sentiment to make sure that the tag is versatile.
And here it is on a wine bottle just so you can see how it would look ... although this bottle is longer than most.  I got this in France when I was there - I've been to the vineyard in California but this is the original one back in Europe - Domaines Schlumberger.  Sooo delicious!

I am thankful to Dawn for pushing me to use colours I wouldn't usually use together ... it's always good to creatively stretch, right!

--------------------------------------

If you have a moment, check out my gently used item sale *here*.  I have stamps, ink pads and other things too ...  even Papertrey products!

Stamp-a-Faire 2015 - Mixing Patterns: Hello


For this challenge, it was all about mixing patterns.  I had fun mixing different scales using some DCWV patterned papers and a piece of scrap paper from some Fresh cosmetic packaging (the hot pink strip).
I added dot roller glue all over the white linen card base and then added the strips, trimming off afterwards.  I die cut the Hello die four times using 110lb white Recollections card stock and then added the dark patterned paper to the top layer.
After the fact, I think that using hot pink under the black would've been a cooler effect but alas, it's done already! :)

This was a good challenge for me because I don't like to mix patterns and am always quite nervous but I did my best ... I "made it work"!
So, do you like to mix patterns and colours?  Are you more inclined to keep your cards simple?

************************
If you have a moment, check out my gently used item sale *here*.  I have stamps, ink pads and other things too ...  even Papertrey products!


Stamp-a-Faire 2015 - Unconventional Materials: Hello


I love the idea of this challenge - using unconventional materials for a card!  I once bought some bolts that looked really cool (tooth like edges) and used them on a card for my Dad but couldn't find them in my craft stash.  So I "made it work" and tried something else:
I used some Heidi Swapp gold mist to create my background ... usually I have such difficult doing this but did my best.  Then, I die cut the bird and used my unconventional material (can you tell what it is?)  I added a Modern  Basics sentiment in Versafine Onyx Black ink.
To do some 'recycling' of materials, I even used a Kate Spade hot pink post card I received a while back to do the die cutting!  Below you can see the unconventional material - do you recognize it?
If you guessed drywall tape, you were right!  It is a great lightly sticky mesh tape that die cuts beautifully and makes a great border too!
************************
If you have a moment, check out my gently used item sale *here*.  I have stamps, ink pads and other things too ...  even Papertrey products!

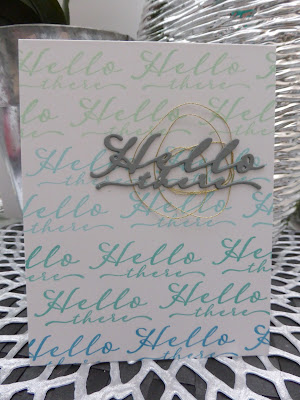
Stamp-a-Faire 2015 - Threads challenge: Hello there


The next challenge was inspired by a video by one of my very favourite designers, Laura Bassen.  I was so sad to hear that she had stepped down from the design team as I always love what she does with PTI products ... But I totally understand her decision as she is a busy lady with a big family and many commitments.  <3 div="">
My thread nesting ability is in the negative numbers so you will have to excuse the nest which is not so nest like! :)
I stamped the Scripted sentiment in an ombre order of pigment ink colours from Fresh Ink and Avery Elle (see inks above in picture).
I then layered some gold thread and a gray die cut from the Scripted die set.  I found it very difficult to do the whole thread nest thing but will have to practice a bit!
So are you an expert thread nester?  Are you learning too?
************************
If you have a moment, check out my gently used item sale *here*.  I have stamps, ink pads and other things too ...


Stamp-A-Faire 2015 - Patterns challenge: wish & love you so much


For this challenge, it was all about card patterns as inspiration.  The first one looked like a great one  to start with:

I took the Chevron cover plate and cut some heavy Strathmore watercolour paper.  I kept the whole thing intact and did some watercolouring with my Zig Real Brush pens - love these!!  I scribbled a bunch of ink on my clear block and then took an aqua brush and did some messy watercolouring in rainbow order.
 When I first got my pens, I did some work on labeling the tops using a hole punch, some glue and then Glossy Accents over top for a hard durable finish.  This was a great idea that Jennifer McGuire had - brilliant, really!  She went a step further and did one side solid colour, the other side watercolour but I kept it simple.
Of course, when I was trying to get this picture with my camera phone, I proceeded to knock the whole pack over and had to put them back in ... classic, right?! :)
After watercolouring, I kept the pieces together and dabbed some Tombo Mono Aqua glue on the back of the cut outs and adhered them to a second card base so I can make another card later.  Super simple but a great way to use the scraps!
I die cut a Harvest Berries leaf sprig in polka dot patterned vellum and a grey Wet Paints die cut with a gem for some bling.  (note: I took creative liberties and didn't add twine or string like the sketch had ... hope that's ok!)
edited to add: I forgot to add pictures of the inside of the card ... I did a simple ombre stamped sentiment (Fresh Ink Fuschia and Sugar) with some stars in the background with Provincial Gray ink:
 And a close up:

Before moving on to the next challenge, I decided to try another pattern and took this gorgeous understated one from Heather as my inspiration:
I took a Kraft card base and added a piece of DCWV foil patterned paper to the edge.  Next I went back to my Perfect Pearls powder in Perfect Pearl using Sketched Shapes and Versamark.  I brushed on the powder and wiped away the excess with a used dryer sheet - this works really well!
I added an Enchanted Evening die cut using Scripted and then stamped the sentiment in Versafine Deep Lagoon which is a great saturated navy colour.
You can see the shine a bit better above - Perfect Pearls are a great medium and very easy to use!

So, how is your creating going today?  Are you losing steam?  Keeping up?

************************
If you have a moment, check out my gently used item sale *here*.  I have stamps, ink pads and other things too ...

Stamp-A-Faire 2015 - Bridal Challenge: monochromatic white on white


The team over at Papertrey Ink have worked hard to create a day of crafting challenges and inspiration.  The first was a bridal challenge using white supplies. I loved the idea of a monochromatic card and kept mine super simple.
I took the Twist cover plate and embossed the background of a 110lb white piece of Recollections card stock.  I then die cut 'love' using one of the Wet Paint dies four times and layered them one on top of each other for dimension.  
I temporarily glued this to a piece of scrap paper and added Glossy Accents and then a healthy sprinkling of Ranger Rock Candy glitter.  

I decided to try another technique using some Versamark ink and Perfect Pearls powder in the shimmery silvery colour Perfect Pearl.  Confusing, right? ;)
I repeatedly stamped one of the vases from Gracious Vases and then added the powder over top. (You'll notice they're not even since I couldn't see where I was stamping due to the clear nature of the ink ... let's just pretend that I did it that way on purpose!)  I cut a strip of striped vellum and adhered a white Circle Scribbles die cut over top ... super simple and monochromatic.
Above you can see a peek of the inside of the card - I used Betsy Veldman's trick of an added pop of colour with a aqua mist card base.  Love this idea but always forget about it!
 I love the shimmer of Perfect Pearls but it is so hard to capture, especially when the sun is not out!  We have needed rain for a while on the West Coast due to the drought and forest fires but it is not ideal for good pictures with lots of natural light! :)
So what have you created so far?  Are you enjoying the festivities?
-------------------
If you have a moment, check out my gently used item sale *here*.  I have stamps, ink pads and other things too ...

Tuesday, August 25, 2015

Papertrey August 2015 blog hop

What gorgeous colours for this month's blog hop!!  I was happy to get my fingers all inky - I have been away most of the summer and haven't had a chance to make any cards.

Here is the inspiration pic:
I experimented with watercolouring a Bloomers die but it didn't stand out enough so redid the diecut with a simpler design.  Here's what I finally came up with:
I used my MISTI stamping tool to get solid impressions and a thick plastic quilting sheet I had cut down to push the card stock against.
I used a variety of Avery Elle and Fresh pigment inks to stamp the Watercolor Wonder stripes - I just love the saturation of pigment inks!  From top to bottom - Red Currant, Fuschia, Pixie, Peach.
I added some Fresh Sugar ink to the edges of the Bloomers die cut and added some Soft Stone accents to the flower before adding a Versafine Onyx Black Scripted stamped sentiment (now, that's a mouthful!)  I used some foam tape to add dimension to the die cut and show off the placement of the sentiment on both the card base and Bloomers flower.

And here's my other creation using the same colours and Ashley's Make it Monday technique of masking the sentiment:

-----
If you have a moment, check out my gently used item sale *here*.  I have stamps, ink pads and other things too ...

Friday, July 10, 2015

Experimentation with 3D embossing folders

Hope you are having a good summer ... the weather here on the West Coast has been hot, hot, hot!  We had a heat wave with forest fires in the interior and up a bit more North ... so much smoke in the air even in the city.  It has started to lift, luckily, but the usual gorgeous ocean views are a bit muted even still.

Here are some pictures from a walk along the sea wall last night:

 And here are the views you usually can see:

Crazy, right?  Well, the weather has started to cool and we are supposed to get some rain this week (less than 1 mm but better than nothing!) so things are looking up. 

Ok, on to the crafty part of this post ... :)

I was so excited to use my new Next Level 3D embossing folders and PTI dies... what fun!  The folders are from We R Memory Keepers.   The cool thing is that they emboss on many different levels so they are something fun and new.  

I bought the Gemstone pack because I love hexagons and the other one really intrigued me too.

I made a super simple embossed panel in Gina K orange and added a PTI Tropical Teal Scripted die cut using four layers built up with some Glossy Accents in between.  Sometimes I add some of this adhesive to the top for some shine but I kept this card super simple.  I did pop the panel up with some foam dots onto a piece of Recollections 110lb cream card stock for added dimension.  It was a bit tight in an A2 envelope but still fit just fine!

I found the best way to use these embossing folders with my Big Kick was to leave all the tabs on the multi purpose platform and then just one cutting plate.  If you are not getting quite enough pressure, you can add a piece of card stock or two.  Because of the multiple levels of embossing, two plates is far too much!  You could add an embossing mat if you so desire.  Experimentation is key!  And don't force it - I broke a machine that way a while back ... Lesson learned! *wink*

I will post another card soon with the other embossing folder - it is gorgeous too!!  I have done some experimenting but haven't finished these cards:
But you can see the amazing dimension with these folders - love them!!

Any new purchases you have made lately?  Please share ... we crafty gals are such enablers! Tee hee!!

-----
If you have a moment, check out my gently used item sale here.  I have stamps, ink pads and other things too ...

Happy summer!